How to Use
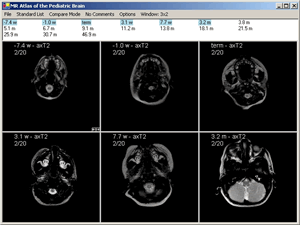
By default the atlas opens in Compare Mode (Multiple Patients, Single Series) showing a single T2-weighted image in each viewing window of the first 6 patients in the Standard List.
It should look something like this:

Basic Image Navigation - Quick Start
The box below the menu bar contains a list of cases/patients ordered by corrected gestational age and listed in weeks (w) or months (m). The highlighted cases/patients are the ones currently assigned to the viewing windows. You can click on any case in the list to start with a new set of cases in the viewing windows, or you can click on the forward and reverse arrows in the first viewing window to move through the cases.
To scroll forwards or backwards through a series, left-click on a window and hold the left mouse button as you move the mouse up or down.
Hold down the right mouse button to select a different series to place in a viewing window. By default, all appropriately linked windows will scroll at the same time as the window you scroll. If you want to unlink or re-link the image scrolling, go into the Options menu and check or uncheck the Link Image Sets When Scrolling option.
Menu Bar Controls
Case list selection:
![]()
The default case list is the Standard List which contains the core, or most applicable, cases. By clicking on Standard List on the menu bar, you can switch to two other lists.
Expanded List includes all cases in the Standard List as well as additional cases that may be useful for further comparison.
The Checked Only list adds checkboxes next to the Standard List cases. This allows you to customize exactly which cases are to be viewed. In this mode, only the checked cases will be shown in the viewing windows. For example:
![]()
Mode selection:
![]()
The initial display mode is Compare Mode. You can change the display mode by clicking Compare Mode on the menu bar and then selecting one of the three options that appear. It will then change the menu title to the newly selected option.
Compare Mode allows you to compare the same series over multiple patients. If you right-click on a viewing window and select a series, the program will open that series for all of the selected patients. Only one series can be shown at a time in compare mode. To scroll forwards and backwards through a series, left-click on a window and hold the left mouse button as you move the mouse up and down.
Case Mode allows you to compare multiple series of a single patient. Only one patient will be selected at a time (the default is the patient in the upper left window). You must right-click on each viewing window to load different series for the selected patient. Changing the selected patient will change all the viewing windows and load the selected series for the new patient.
Sheet Mode allows you to view one series from one patient in detail. It opens the series currently residing in the first viewing window into an array viewing mode simulating a printed sheet of film.
Comment selection:
![]()
The image sets have comments associated with them. Some comments apply to every image for a given case/patient, while other comments are specific for a given series or even a single image. There are three modes for viewing comments, which can be changed from the comments menu ("No Comments" by default).
No Comments: No comments shown.
Show Single Image Comments: When you move the mouse over an image, any comments associated with the image will pop up and be shown.
Show All Image Comments: A small comment window will pop up at the bottom of every image window and stay visible, showing the comments associated with each window's image.
Options:
![]()
Preset Levels: The axial images have five preselected levels labeled "A" through "E," which are at the same five locations in each series: midbrain, cerebral peduncles, two levels at the basal ganglia, and centrum semiovale. This allows you to easily compare similar levels across multiple series. You enable preselected level viewing by clicking the Options menu and selecting Show Preset Levels Only.
Scrolling Through Series: To scroll through a series, left-click on a window and hold the left mouse button as you move the mouse up and down. This will scroll forwards and backwards through the series. If the series are linked, as they are by default, then all appropriately linked windows will scroll at the same time as the viewing window you scroll. If you want to unlink or re-link the image scrolling, go into the Options menu and uncheck or check the Link Image Sets When Scrolling option.
Window selection:
The viewing windows start out as a 3x2 array. Also note the two small arrow buttons in the lower right hand corner of the upper-left-most window. These buttons allow you to cycle forwards and backwards through the case list without having to manually click the case list. You load series into the viewing windows by right-clicking within a viewing window and selecting a series. However, be aware that there are three different modes that will affect the behavior of the viewing windows.
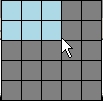
To change the layout of the viewing windows, left-click the Window: 3x2 menu option. This will pop up a small window with a 5x5 grid that looks like this:

Move the mouse around on the grid to select the new window arrangement layout that you want, and then click it. The viewing windows will rearrange themselves and load the appropriate series automatically.
Questions or Comments?
For any questions or comments, please send an email to Ed Weinberger.
